Thanks to the current wave of digital transformation, the demand for agile development, rapid delivery, immediate app updates, and fast bug fixes is at an all-time high. The domino effect of this increased demand has led to a world of IT infrastructure headaches, particularly related to production and testing environments.
Containerized applications seem to be the only way out. And this is why containers, cluster management, and promising open-source container orchestration systems like Kubernetes are a current hit with IT professionals (and for years to come).
Not sure about what Kubernetes is used for and how to get started with it? Read on to learn all that you need to know to install Kubernetes for the first time - and whether you want it the hard way or the easy way.
If you’re just looking for a quick way to get started with app deployment in Kubernetes, visit Convox and check out our fast track simplified, smooth, and speedy process.
Now, let’s dive right in and clarify some popular terms:
What is Kubernetes?
Kubernetes lets you create, manage, maintain, test, and schedule your application deployments in one place. Its ability to manage containers and clusters adds portability and scalability to your applications inherently.
To clarify, Kubernetes is not an IaaS because it requires you to set up an infrastructure layer (e.g. Amazon AWS EC2, Apache Mesos, Azure, etc.) beneath it. In fact, this container orchestration engine can also run on your own servers/infrastructure.

The major advantage of having your app on Kubernetes is that you can schedule and execute your applications in containers onto the virtual machines of your infrastructure. This makes Kubernetes a perfect solution for cloud-native app development.
Kubernetes allows you to:
-
Scale: Your containers can orchestrate across various hosts with Kubernetes. Additionally, Kubernetes also makes it easy to mount & add storage for stateful apps to improve their performance. Providing resources on the go allows organizations to optimize the use of hardware resources, rather than keeping these resources idle for future requirements.
-
Manage: With Kubernetes, your applications are managed and run optimally. From deployments to updates, automation, maintenance, and instance execution - all aspects are kept under your control.
-
Automate: IT operations like health monitoring for the apps can be automated with Kubernetes. This platform can detect crashes and perform the auto-restart, auto-replacement, auto-scaling, and auto-replication of your processes through its self-healing capabilities.
Kubernetes Terminology
While you might know how to pronounce Kubernetes (Coo-Burr-Net-Ease) and its related terms, it is a good idea to understand them in-depth. This knowledge will help you grasp how Kubernetes works and cut through the technical fluff about how to get started with it for your applications.
So, let’s begin.
What is a Pod in Kubernetes?
A pod is a group of one or more containers that are deployed onto the same node. It means that all containers for a pod share the IP address, resources, and even the hostname. They can all access a shared volume while running.
Pods are helpful in letting the containers move around the clusters and scale to any limits. As they are responsible for fetching networking and infrastructure resources for underlying containers, they are essential for container deployment.
What is a Deployment in Kubernetes?
One deployment may have multiple pods. In fact, they are the skeleton view for creating pods from a template when required. Deployments are responsible for controlling the CPU requirements, running, updating, rolling deployment, and replication of pods.
What is a Namespace in Kubernetes?
A namespace is the logical subdivision of clusters that helps in the organization of pods, deployments, and services for each cluster. Within a cluster, there can be any number of namespaces, and each of them can communicate with one another.
What is the connection between Docker and Kubernetes?
Docker is a platform for container creation. It lets you pack your application’s modules for platform independence. On the other hand, Kubernetes is the orchestration platform, which offers great portability, flexibility, and a virtual run-time environment for your application. Together, they can ensure higher security and scalability for your deployments.
What is kubectl?
A command-line tool, kubectl acts as the medium for interacting with the Kubernetes API Server through API calls. It utilizes the master-worker architecture to query the master node through these calls/commands.
Kubernetes Master Components
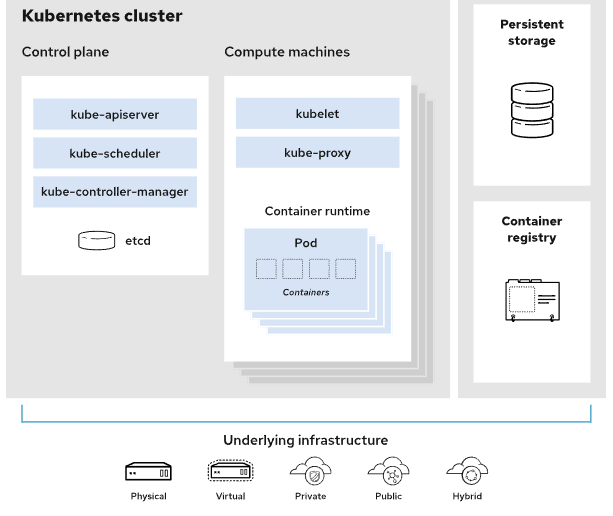
- etcd cluster
This cluster is the core of Kubernetes master security and therefore, is accessible through the API only. It stores distributed key values with information on cluster data, e.g. pod count, pod state, namespace, etc. This component uses watchers to keep a check on changing details.
- kube-apiserver
The API server is the destination for all REST calls coming from pods, services, and controllers to the Cluster. It is the only component that can interact with the cluster, maintaining the consistency of its data and access requests.
- kube-controller-manager
This controller manager is responsible for running various controllers as required. Replication, services, replacement, configuration updates, pod capacity/usages, etc. are co-ordinated through it.
- cloud-controller-manager
Controller processes with dependencies on the setup’s cloud provider are executed under its control.
- kube-scheduler
As per the resources required for application(s) execution, the scheduler assigns pods to nodes.
Kubernetes Worker Components
- kubelet
It connects with kube-apiserver and continually interacts with the pods being modified or created. Besides enabling worker-master communication, the purpose of doing so is to monitor the health of underlying containers and make sure they are in the expected state. The monitored data is sent to the master.
- kube-proxy
This proxy service takes care of host subnetting for all worker nodes contacting the other networks or the internet. It also acts as the mediator for pods/containers of isolated networks within the cluster.
Kubernetes Cluster
An entire Kubernetes cluster comprises of the control plane with master components, persistent storage, container registry, runtime environment, and worker processes. So, pods, services,, and containers can use the resources available to them within the cluster while also utilizing any external infrastructure that is accessible to them.

How does Kubernetes work?
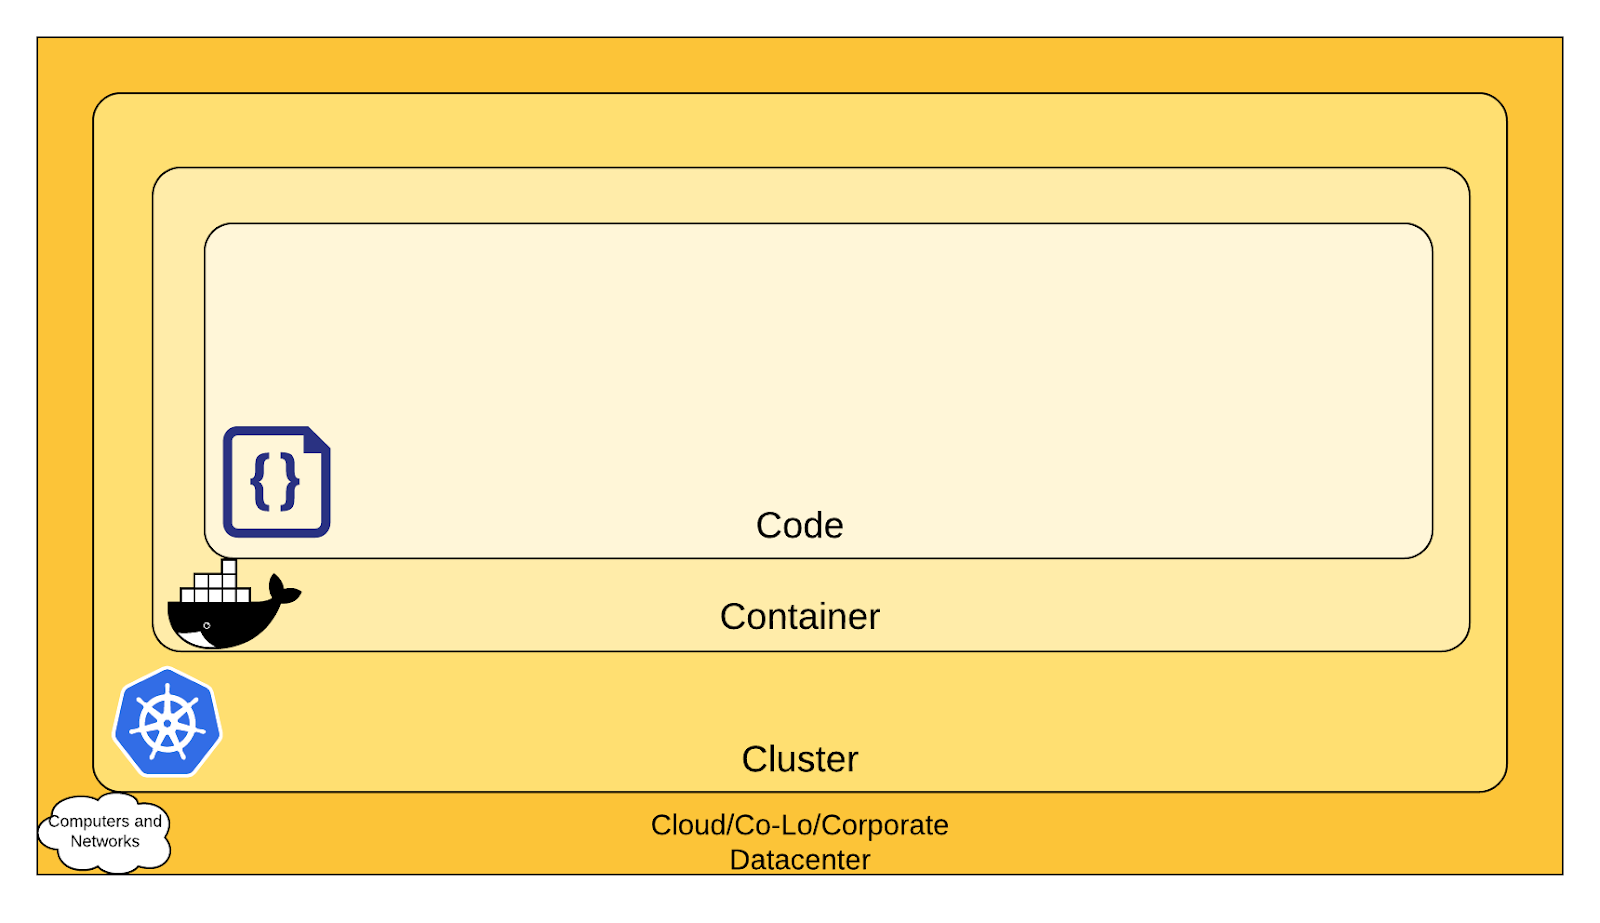
The cluster combines various nodes (physical or virtual machines) where your services and applications are deployed in Pods.
The control plane within the cluster controls how application containers or pods are deployed or executed while managing the resources within the cluster.
To manage workloads and communicate within the cluster, worker nodes run the kubelet process. The kubelet communicates directly with the API server to report node status and retrieve information about which pods should be scheduled. It also communicates with the node’s container runtime(Docker) to ensure the running pods are in a healthy state.
What is Kubernetes used for?
Kubernetes is used to manage containerized, cloud-native, applications. It is excellent for the rapid delivery of app updates in order to meet your ever-evolving business needs.
With Kubernetes, it is truly possible to build ‘write once, run everywhere’ applications. Broadly, its scope can be summarized as -
-
Suitable for cloud-native solution development;
-
A powerful tool in a DevOps-focused solution;
-
Helps deliver solutions faster;
-
Reduces interdependencies through containerization to ensure better security;
-
Ideal for rapid delivery and frequent updates.
The ‘Global’ Pain-point: Getting Started With Kubernetes
While the popularity and usage of Kubernetes keeps growing, its reputation is of a tool that is ‘too tough to configure’. A standalone Kubernetes installation can present headaches before, during, and after installation. It can come at the cost of frequent Kubernetes consultations and services. Or it might demand the intervention of dedicated Kubernetes professionals to execute the job.
From the deployment of a new cluster to security implementation and beyond, using Kubernetes can be a complicated task.
The Typical Process: How do I Get Started with Kubernetes?
If you’re still willing to face the pain, you might be thinking of configuring Kubernetes for your application(s). No worries - first, we will walk you through the typical method (and then the easier one later on!).
- Select your Cloud Platform for Kubernetes, as it will decide the next steps to be followed. For example,
a. For Google Cloud Platform, you will have to follow these steps:
-
Install the later version of Python;
-
As per your operating system, download the SDK from this link;
-
Extract the archive;
-
Run the install.sh script and restart your terminal thereafter;
-
Now is the time to install a command-line for Kubernetes. So, use this command to install kubectl:
$ gcloud components install kubectl
-
Complete the setup using gcloud init command and follow the instructions provided for the setup.
-
Now, we are ready to use Kubernetes. So, proceed by creating a cluster (let’s say, demo_kb) using this command:
$ gcloud container clusters create demo_kb
- Set it as your default cluster using this command:
$ gcloud config set container/cluster demo_kb
- Finally, pass these credentials to kubectl to connect the cluster to Kubernetes:
$ gcloud container clusters get-credentials demo_kb
- To verify if it’s done right, try fetching nodes details:
$ kubectl get nodes
In the case of Azure, the process is even lengthier and more complex. But, can all these steps be completed in seconds rather than days? Yes, there is a way.
How to install Kubernetes the smarter way: Convox
Instead of manually configuring Kubernetes yourself for app development and deployment, you can use Convox. The Convox platform is designed to simplify your infrastructure management tasks. With Convox, you and your team can smoothly deploy, scale, and manage applications effortlessly, exploiting the power of Kubernetes, without the headaches.
In a nutshell, Convox manages the Kubernetes installation and configuration process in the background so that you can get your app up and running in a couple of clicks.
How do I Get Started with Kubernetes using Convox?
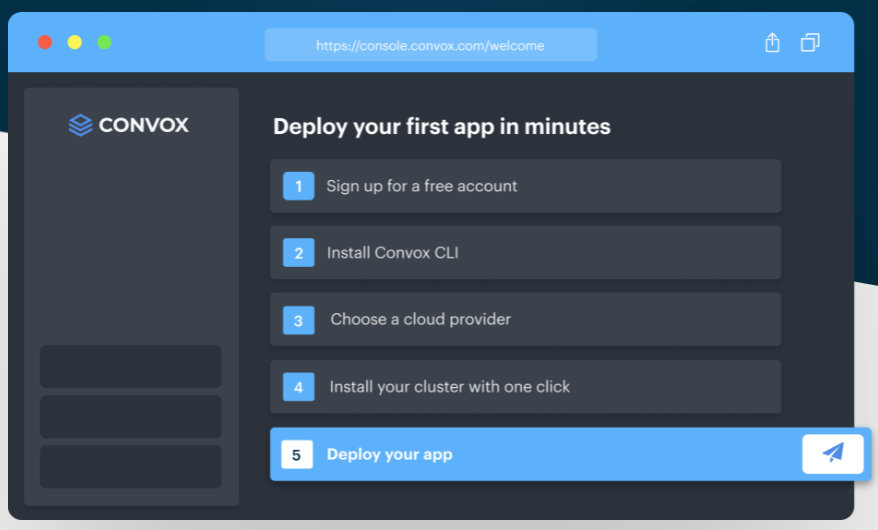
With Convox, you have a well-guided GUI to complete the Kubernetes configuration and app deployment process in a few clicks. See the steps below -
Sign up for your free Convox account.
- Install Convox CLI as per your operating system and login. For this, you may copy the command from Convox dashboard for your machine and use it directly.

- The next step is to select your Cloud Provider in Integrations > Runtime.
Convox will install your Kubernetes cluster within your own cloud provider account, so everything is within your power and control, so now simply choose your provider. Convox supports running on DigitalOcean, AWS, Google Cloud, and Microsoft Azure. Now, you may create your cluster with a single click.

-
Install a Rack (the Convox wrapper for your Kubernetes cluster). To get started use the link Racks in the left menu. There are no limits to the number of apps you can deploy to a single Rack, or to the number of Racks that you can create and use. It is recommended good practice to separate your Production and Staging/Testing/Development deployments on distinct Racks however. Some users even create a Rack for every developer on their team!
-
Once your Rack is created, you are able to deploy your configured and containerized apps to it. You are welcome to clone a test app from this example repository for testing, or go ahead and check out our documentation on how to set up your app for deployment.
Yes. It’s that simple. Check out this picture summarizing the Convox setup steps, or view this detailed guide to follow the simple process.

The Final Word
The complexity of the process is a major obstacle in Kubernetes cluster configuration and app deployment for developers and teams. But as the tool is powerful and full of essential features, you obviously need a better way to do so rather than missing out. You can now use Convox and complete Kubernetes-based deployment using its intuitive UI in minutes.


